Bitter gourd, also known as bitter melon or Momordica charantia, is a popular vegetable in many Asian cuisines and is highly valued for its medicinal properties. Its distinctive bitter taste is packed with nutrients and health benefits, including regulating blood sugar, aiding digestion, and supporting immunity. Growing bitter gourd in your garden can be highly rewarding, and using a trellis system not only saves space but also promotes healthier plants, easier harvesting, and higher yields.
This ultimate guide will walk you through simple, effective techniques for growing bitter gourd on a trellis—from choosing the right variety to harvesting large, healthy fruits.
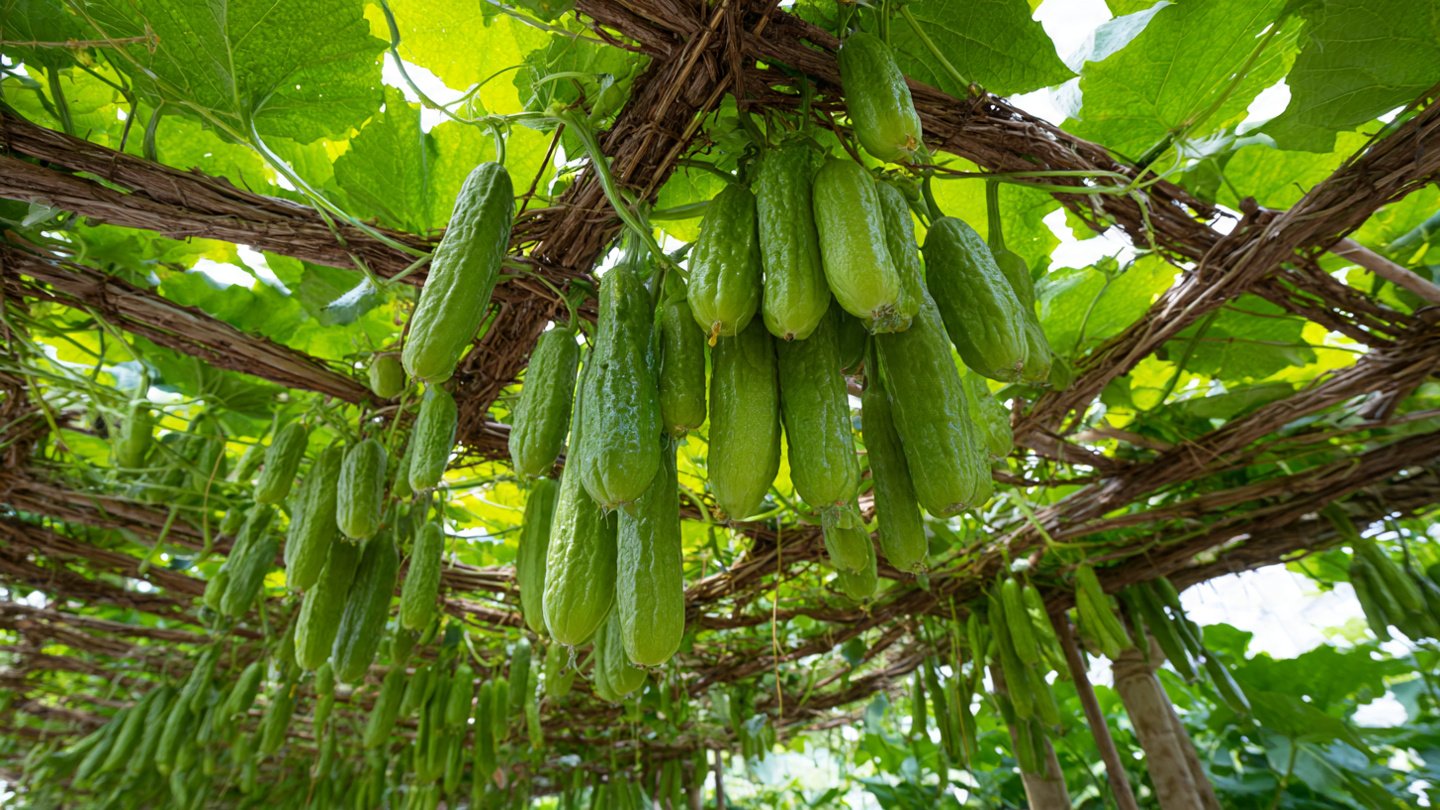
Why Grow Bitter Gourd on a Trellis?
Bitter gourd is a climbing vine, and trellising offers multiple advantages:
- Space Efficiency: Vines grow vertically, saving ground space for other crops.
- Improved Air Circulation: Reduces the risk of fungal diseases and pest infestations.
- Easier Harvesting: Fruits hang visibly on the trellis, making picking simpler.
- Better Fruit Quality: Hanging fruits develop straighter, cleaner, and less prone to rot.
- Enhanced Sunlight Exposure: Vertical growth allows leaves and fruits to receive optimal sunlight.
Using a trellis ensures your bitter gourd plants grow strong, productive, and healthy.
Step 1: Selecting the Right Bitter Gourd Variety
Choosing the right variety depends on your taste preference, climate, and available space. Common varieties suitable for trellis cultivation include:
- Hybrid Varieties: High-yielding, disease-resistant, and uniform fruits. Examples: ‘Pusa Do Mausami’ or ‘Arka Harit’.
- Long Varieties: Produce elongated fruits, often 10–12 inches in length.
- Small or Mini Varieties: Compact fruits, perfect for small gardens or container growing.
Hybrid varieties are generally recommended for beginners due to their consistent performance and resistance to pests and diseases.
Step 2: Choosing the Right Trellis
A strong trellis is essential to support the weight of the vines and fruits. Here’s how to choose and set up one:
- Material: Bamboo poles, wooden stakes, metal frames, or wire mesh are all suitable.
- Height: Ideally 6–8 feet tall to allow vines to climb freely.
- Structure: A-frame, vertical netting, or horizontal lattice can be used.
- Stability: Secure the trellis firmly in the soil to withstand wind and the weight of mature fruits.
Proper trellis support prevents vines from trailing on the ground, reducing disease and improving yield.
Step 3: Preparing the Soil
Bitter gourd thrives in fertile, well-draining soil. To prepare your garden bed:
- Soil Type: Sandy loam or loamy soil rich in organic matter is ideal.
- pH Level: Slightly acidic to neutral (6.0–7.0).
- Fertilization: Mix in compost, well-rotted manure, or organic fertilizer before planting.
- Bed Preparation: Loosen the soil to a depth of 12–15 inches to allow proper root growth.
Healthy soil provides essential nutrients, promotes strong vine growth, and supports abundant fruiting.
Step 4: Sowing Seeds or Transplanting Seedlings
Bitter gourd can be grown from seeds or seedlings:
- Seeds: Soak seeds overnight in water to improve germination. Sow seeds 1 inch deep, 2–3 per hill, and thin to the strongest plant after germination.
- Seedlings: Transplant 3–4 week-old seedlings into the prepared bed. Handle roots gently to prevent damage.
Spacing: Space hills 3–4 feet apart along the trellis to allow sufficient air circulation and sunlight exposure.
Step 5: Watering Techniques
Bitter gourd requires consistent moisture for optimal growth:
- Frequency: Water deeply 2–3 times per week, more often in hot, dry weather.
- Avoid Waterlogging: Too much water can lead to root rot.
- Mulching: Apply straw, dried leaves, or plastic mulch to retain soil moisture, suppress weeds, and regulate temperature.
Proper watering ensures vigorous vine growth, healthy leaves, and high-quality fruits.
Step 6: Fertilizing for Maximum Yield
Bitter gourd is a heavy feeder and benefits from regular fertilization:
- Initial Fertilization: Apply nitrogen-rich fertilizer during early growth to promote strong vine development.
- Flowering Stage: Switch to phosphorus-rich fertilizer to encourage flowering and fruit set.
- Fruiting Stage: Use potassium-rich fertilizer to enhance fruit size, flavor, and color.
- Organic Alternatives: Vermicompost, compost tea, or liquid manure can be applied every 2–3 weeks for continuous nutrition.
Balanced feeding ensures vigorous growth and high fruit production.
Step 7: Training Vines on the Trellis
Training vines is key for a successful trellis-grown bitter gourd:
- Gently guide young vines toward the trellis to encourage climbing.
- Use soft ties or garden twine to secure vines if needed.
- Prune excessive lateral shoots to focus energy on main vines and fruits.
Proper training results in stronger vines, higher yields, and cleaner, straighter fruits.
Step 8: Pollination
Bitter gourd has male and female flowers on the same plant. Adequate pollination is necessary for fruit development:
- Natural Pollination: Bees and other insects usually do the job outdoors.
- Hand Pollination: For indoor or low-pollinator areas, use a small brush to transfer pollen from male to female flowers.
Successful pollination leads to fuller, healthier fruits and maximizes production.
Step 9: Pest and Disease Management
Bitter gourd can be affected by pests and diseases, but trellis cultivation reduces some risks. Common issues include:
- Fruit Flies: Cover developing fruits with paper or mesh bags to prevent infestation.
- Aphids and Whiteflies: Spray neem oil or mild insecticidal soap as needed.
- Powdery Mildew: Ensure proper air circulation and avoid overhead watering.
- Downy Mildew: Remove infected leaves promptly and maintain healthy soil.
Early detection and preventive care help maintain healthy vines and maximize fruit yield.
Step 10: Harvesting Bitter Gourd
Proper harvesting ensures continuous production:
- Timing: Harvest fruits 50–70 days after sowing when they are medium-sized, firm, and still green.
- Regular Picking: Frequent harvesting encourages the plant to produce more flowers and fruits.
- Handling: Use a sharp knife or scissors to cut fruits to avoid damaging the vine.
Avoid letting fruits over-mature on the vine, as this can reduce overall production.
Tips for Maximizing Yield
- Sunlight: Ensure plants receive at least 6–8 hours of direct sunlight daily.
- Regular Pruning: Remove weak or diseased vines to focus energy on productive growth.
- Soil Health: Add compost periodically to maintain fertility.
- Support Heavy Fruits: Tie larger fruits to the trellis with soft cloth to prevent breakage.
- Companion Planting: Plant corn, beans, or marigolds nearby to improve pollination and deter pests naturally.
Advantages of Growing Bitter Gourd on a Trellis
- Space Efficiency: Vertical growth saves garden space for other crops.
- Improved Fruit Quality: Clean, straight, and healthy fruits develop on hanging vines.
- Disease Reduction: Air circulation reduces fungal infections.
- Ease of Harvest: Fruits are easily visible and accessible.
- Higher Yield: Properly trained vines produce more fruits per plant.
Conclusion
Growing bitter gourd on a trellis is an effective, space-saving, and productive method that yields healthy, high-quality fruits. By selecting the right variety, preparing fertile soil, providing proper support, managing water and nutrients, and practicing effective pest control, gardeners can enjoy a bountiful harvest of bitter gourds.
Trellis cultivation transforms bitter gourd into a manageable, high-yield crop, making it ideal for both small and large gardens. Following these simple steps ensures strong vines, vibrant flowers, and abundant, nutritious fruits that can be enjoyed fresh or in traditional recipes.
With consistent care, patience, and attention to detail, your trellis-grown bitter gourd plants will become a rewarding centerpiece of your garden, providing beauty, nutrition, and satisfaction for months.