In recent years, more gardeners have been turning away from chemical fertilizers and embracing natural, eco-friendly alternatives. One of the best options is homemade biofertilizer—a nutrient-rich, living fertilizer made from organic waste and beneficial microorganisms. It is inexpensive, easy to prepare, and incredibly effective in improving plant health, soil fertility, and overall garden productivity. This complete guide will show you how to make biofertilizer at home and use it correctly for lush, thriving plants without chemicals.
What Is Biofertilizer?
Biofertilizer is a natural fertilizer that contains beneficial microorganisms, organic nutrients, and plant growth–promoting substances. Unlike chemical fertilizers that feed plants directly but damage soil life over time, biofertilizers improve soil structure, increase microbial activity, and help plants absorb nutrients more efficiently.
Homemade biofertilizers are usually prepared using kitchen waste, plant materials, animal manure, or natural sugars, all fermented with water to create a powerful liquid plant tonic.
Why Use Homemade Biofertilizer?
There are many reasons to switch to homemade biofertilizers:
- Chemical-free gardening: Safe for you, your family, and the environment
- Cost-effective: Made from waste materials already available at home
- Improves soil health: Encourages beneficial bacteria and fungi
- Boosts plant growth: Enhances root development, flowering, and fruiting
- Reduces waste: Recycles kitchen scraps and organic leftovers
Over time, regular use of biofertilizer leads to healthier soil and stronger, more disease-resistant plants.
Key Benefits for Plants and Soil
Homemade biofertilizers work in multiple ways. They provide essential nutrients such as nitrogen, phosphorus, potassium, and trace minerals. More importantly, they activate soil life, which helps break down organic matter and release nutrients gradually.
Plants grown with biofertilizers often show:
- Greener leaves
- Stronger stems
- Better flowering
- Increased fruit yield
- Improved resistance to pests and stress
Basic Ingredients for Homemade Biofertilizer
You don’t need expensive materials to make biofertilizer. Most ingredients are easily available at home or nearby.
Common ingredients include:
- Kitchen vegetable waste (peels, scraps)
- Overripe fruits
- Cow dung or cow urine (optional but powerful)
- Jaggery, molasses, or brown sugar
- Rice wash water or plain water
- A plastic bucket with a lid
Each ingredient plays a role, especially sugars, which feed beneficial microorganisms during fermentation.
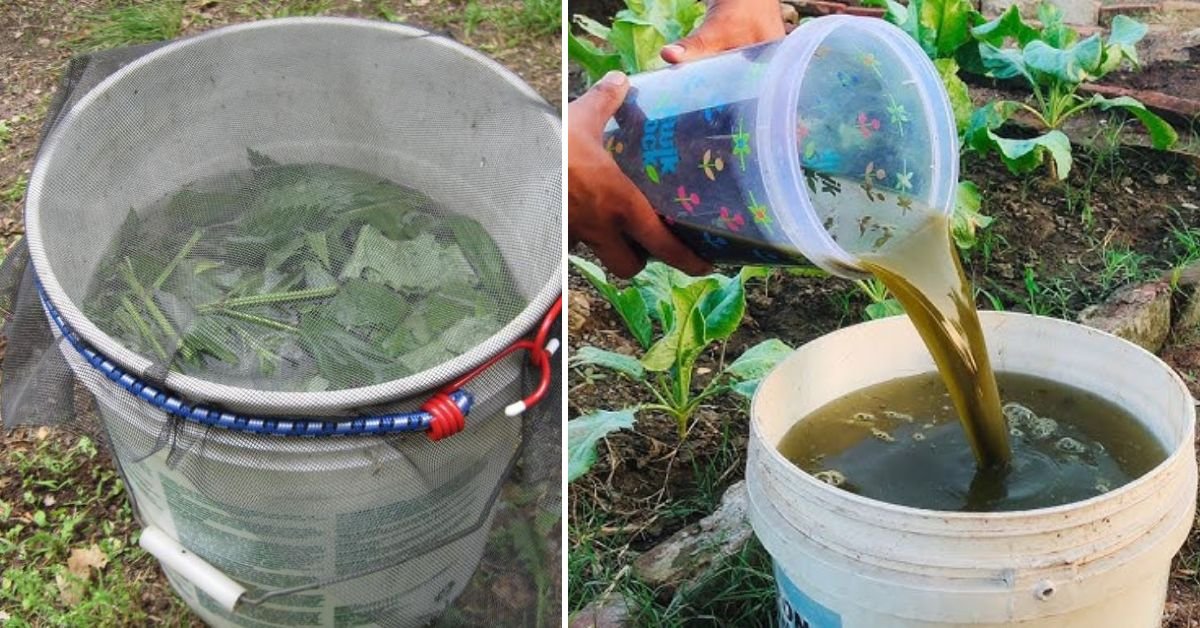
Easy Liquid Biofertilizer Recipe (Beginner-Friendly)
Ingredients:
- 1 bucket (10–15 liters) of water
- 1–2 kg vegetable and fruit waste (chopped)
- 200–250 g jaggery or brown sugar
- A handful of garden soil or compost
Method:
- Add chopped kitchen waste to the bucket of water.
- Dissolve jaggery or sugar separately in warm water and add it to the bucket.
- Add a handful of soil or compost to introduce beneficial microbes.
- Stir the mixture well using a wooden stick.
- Cover loosely with a lid or cloth to allow air circulation.
- Stir once daily.
Fermentation usually takes 7–10 days. The liquid will develop a mild fermented smell, indicating it is ready to use.
How to Know When Biofertilizer Is Ready
A properly fermented biofertilizer:
- Has a sour but not rotten smell
- Shows slight bubbles or foam during stirring
- Has softened or partially broken-down waste
If the mixture smells extremely foul or rotten, it may be contaminated. In that case, dilute heavily before use or discard it.
How to Use Homemade Biofertilizer
Before applying, always strain the liquid to remove solid waste. Dilution is essential to prevent plant damage.
Soil Application:
- Dilute 1 part biofertilizer with 5–10 parts water
- Apply directly to the soil near the plant roots
- Best applied in the early morning or evening
Foliar Spray:
- Dilute 1 part biofertilizer with 10–15 parts water
- Spray lightly on leaves
- Avoid spraying during strong sunlight
Use once every 10–15 days for best results.
Biofertilizer for Different Plants
Homemade biofertilizer is suitable for almost all plants:
- Vegetables: Faster growth, better leaf color, increased yield
- Fruit plants: Improved flowering and fruit development
- Flowering plants: More blooms and longer flowering period
- Indoor plants: Healthier foliage and stronger roots
For young seedlings, use extra dilution to avoid stress.
Solid Waste Reuse After Fermentation
Don’t throw away the leftover solids. They can be:
- Added to compost piles
- Buried directly in garden soil
- Used as mulch around plants
This ensures zero waste and maximum nutrient recycling.
Common Mistakes to Avoid
- Using metal containers for fermentation
- Applying undiluted biofertilizer directly to plants
- Overusing biofertilizer too frequently
- Keeping the mixture in airtight containers
- Allowing the mixture to rot instead of ferment
Simple care during preparation ensures safe and effective results.
How Often Should You Apply Biofertilizer?
For most home gardens:
- Once every 10–15 days during active growth
- Once a month during slower growth periods
Consistency matters more than quantity. Regular mild feeding works better than occasional heavy feeding.
Environmental and Long-Term Benefits
Using homemade biofertilizer reduces dependence on chemical inputs, protects soil organisms, and improves long-term soil fertility. Over time, your garden becomes more self-sustaining, requiring fewer external inputs while producing healthier plants and food.
It also contributes to sustainable living by reducing household waste and promoting eco-conscious gardening practices.
Final Thoughts
Making your own biofertilizer at home is simple, affordable, and incredibly rewarding. With basic ingredients and a little patience, you can create a powerful natural fertilizer that improves plant health, enriches soil, and supports chemical-free gardening. Whether you grow vegetables, fruits, flowers, or houseplants, homemade biofertilizer helps your garden thrive naturally. Start today, and enjoy greener plants, healthier soil, and a more sustainable way of gardening—right from your own home.